

How to Install Everestway Struts Safely — Step-by-Step Guide for DIY Replacement
Replacing worn struts is one of the most impactful suspension upgrades you can perform at home, but it demands precision and respect for safety. A poorly installed strut assembly can fail catastrophically, risking vehicle control and personal injury. This guide walks you through the complete process of installing Everestway struts — from gathering tools and compressing springs safely to torquing fasteners and verifying alignment — so you can complete the job confidently and correctly.
We’ve designed our struts to simplify the replacement process wherever possible, but no part of the procedure should be rushed or improvised. Whether you’re tackling your first suspension job or adding another completed set to your DIY resume, following every step in order matters more than speed.
Tools and Equipment You’ll Need Before You Start
Gather everything before you lift the vehicle. You’ll need a quality floor jack rated for your vehicle’s weight, a pair of jack stands — never work under a car supported only by a jack — and a torque wrench capable of reading both foot-pounds and Newton-meters. A spring compressor is non-negotiable for any strut replacement involving coil springs; trying to remove a spring under tension without one is the single most dangerous mistake a DIYer can make.
Beyond the basics, have a full metric socket set, a breaker bar for stubborn fasteners, penetrating oil, and safety glasses. A second set of hands helps during final assembly, especially when aligning the top mount studs with the strut tower. If your Everestway struts came as a complete assembly with pre-compressed springs, you can skip the spring compressor, but verify that before you begin — most aftermarket struts ship as bare cartridges requiring spring transfer from the old assembly.
Lifting and Supporting the Vehicle Correctly
Park on a flat, paved surface and chock the rear wheels if you’re working on the front suspension, or the front wheels if replacing rears. Loosen the lug nuts while the vehicle is still on the ground, then lift at the manufacturer’s designated jack points — never under the control arm or suspension components themselves. Once the wheel is off the ground, slide a jack stand under the frame rail and lower the jack until the stand carries the full weight.
Double-check that the vehicle is stable before you crawl under it. Rocking the chassis gently by hand should produce zero movement if the stand placement is correct. Remove the wheel completely and set it aside; you’ll need unobstructed access to the strut mounting bolts at both the knuckle and the top of the strut tower. Some vehicles require removing the brake line bracket or ABS sensor wire from the strut body — disconnect these carefully and avoid kinking any lines.
Removing the Old Strut Assembly
Locate the upper strut mount nuts inside the engine bay or trunk, depending on whether you’re working front or rear. Most vehicles use three or four nuts securing the top plate to the strut tower. Support the strut from below with your hand or a jack before removing the final top nut, or the assembly will drop suddenly. At the bottom, remove the bolts securing the strut to the steering knuckle; these are often torqued heavily and may require penetrating oil and a breaker bar.
Once the fasteners are out, pull the knuckle outward slightly to free the strut from its mount, then guide the entire assembly out through the wheel well. If the strut won’t budge, check for any remaining brake line clips or stabilizer bar links you may have missed. Strut assemblies on older vehicles sometimes corrode into place, requiring careful persuasion with a rubber mallet — never strike the strut body itself, only the mounting bracket.
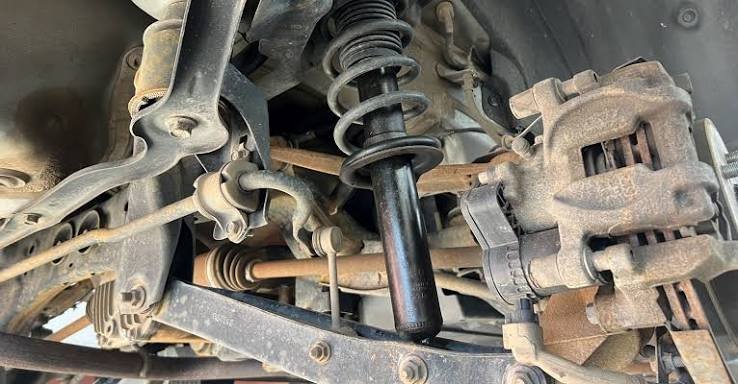
Compressing the Spring and Transferring Components
If you’re reusing the original spring or transferring it to a new Everestway strut cartridge, install the spring compressor evenly on opposite sides of the coil. Tighten each side incrementally, alternating between the two compressors to keep the spring balanced. The goal is to relieve all tension from the top mount so the center nut can be removed safely. You’ll know the spring is fully compressed when you can rotate the top mount freely by hand.
Remove the center nut — often a large hex or Torx fastener — and carefully lift off the top mount, bearing plate, and upper spring seat. Keep all components in order; you’ll reinstall them in reverse. Slide the spring off the old strut and, with the compressors still engaged, transfer it onto the new Everestway strut, ensuring the spring’s end coil seats into the locating pocket on the lower perch. Reinstall the upper seat, bearing, and top mount, then thread the new center nut and torque it to the specification in your vehicle’s manual.

Installing the New Strut and Torquing Fasteners
Slide the new strut assembly up into the wheel well, aligning the top mount studs with the holes in the strut tower. Thread the upper nuts by hand first, leaving them loose until the bottom is secured. Guide the lower end of the strut into the knuckle mount and insert the pinch bolts — some designs use through-bolts instead, depending on your vehicle’s suspension geometry. Tighten the knuckle bolts to the torque specification listed in your service manual; over-tightening can distort the mount and cause premature wear.
Once the bottom is secure, torque the upper mount nuts in a star pattern to ensure even clamping force. Many vehicles specify a torque value between 15 and 25 foot-pounds for the top nuts, but always verify this in your manual rather than guessing. Reinstall any brake line brackets or ABS sensor clips you removed earlier, then release the spring compressor if you haven’t already. The spring should now be seated properly under the vehicle’s weight, not under compressor tension. For more context on when strut replacement timing matters, readers comparing wear patterns often find that front and rear assemblies age at different rates depending on driving conditions.
Complete the Job Right and Enjoy the Upgrade
Installing Everestway struts yourself saves hundreds of dollars in labor costs, but only if you follow every safety step and torque specification without exception. Take your time, double-check your work, and never skip the post-installation alignment. A correctly installed strut assembly transforms your vehicle’s ride quality, handling precision, and overall confidence on the road.
If at any point the job feels beyond your comfort level — especially during spring compression — there’s no shame in handing it off to a professional. We design our struts to be DIY-friendly, but safety always comes first. Once the new assemblies are in and aligned, you’ll immediately notice the difference in control and comfort that fresh suspension delivers.
Notes
You can physically replace one strut at a time, but we recommend doing both sides of the same axle in a single session. Replacing only one side leaves the vehicle with mismatched suspension damping, which creates an imbalance in handling and braking. If budget or time is limited, prioritize the front axle first, then complete the rear as a separate pair later.
Most importantly, never drive the vehicle with one strut removed and the other still installed. Complete the installation on one side fully before moving to the other, or work on both simultaneously if you have two jack stands and the space.
Yes, in nearly all cases. Removing and reinstalling the strut changes the knuckle’s position relative to the chassis, even if you marked everything carefully. Camber and toe angles are especially sensitive to strut replacement, and driving on misaligned suspension accelerates tire wear and can make the vehicle pull to one side.
Schedule an alignment within 50 miles of completing the installation. Many shops offer a pre- and post-alignment report so you can see exactly what changed. This step is required to maintain your Everestway struts warranty.
Reading an Everestway struts review gives you real-world feedback on ride quality, installation ease, and long-term durability that spec sheets alone don’t capture. Reviews often highlight fitment quirks specific to certain vehicle models, helping you anticipate any extra steps or tools you might need during installation.
That said, always cross-reference reviews with your vehicle’s exact year, make, and model. A review praising a strut’s performance on a sedan may not apply directly to a crossover, even if both use the same part number.
Removing the center nut from a strut assembly without first compressing the spring. The coil spring is under hundreds of pounds of tension, and releasing that energy suddenly can cause the spring to launch across the garage or strike the person working on it. Always use a quality spring compressor and tighten it evenly before touching the top mount nut.
The second most common error is failing to torque fasteners properly. Under-torqued bolts can loosen over time, leading to clunking noises or even strut separation. Over-torqued bolts can strip threads or crack mounting brackets.
We recommend replacing top mounts, bearings, and bump stops whenever you install new struts. These components wear at the same rate as the strut itself, and reusing old parts compromises ride quality and can introduce noise. Everestway offers complete strut assemblies that include fresh mounts and hardware, eliminating the guesswork.
If you choose to reuse old parts, inspect them carefully for cracks, tears, or compression damage. Any visible wear means replacement is necessary. Mixing new struts with worn mounts is one of the most common reasons DIY jobs feel incomplete after installation.
Plan for two to four hours per axle if this is your first time, including spring compression and transfer. Experienced DIYers can complete a front pair in under two hours, but rushing increases the risk of mistakes. If you’re installing pre-assembled complete strut assemblies, the job is significantly faster since you skip the spring compressor step entirely.
Always budget extra time for unexpected challenges like seized bolts or misaligned top mount studs. Starting early in the day gives you enough light and energy to work carefully without cutting corners.